
Build and Play Scenes
Store looks as scenes, chain them into steps and play them back.
A scene stores a look and plays it back. It can hold a single look or a sequence of steps that runs over time.
Create a scene
In the Scene List, click the green + and name it. The current programmer content is stored as the scene's first step right away, and the scene is selected.
That means the usual order is: build the look first, then create the scene.
Add more steps
- Change the look, or start an effect.
- Click Add step in the Scene panel.
New steps are pre-filled with the current programmer, so this loop builds a sequence quickly. When the scene runs it moves through its steps in order.
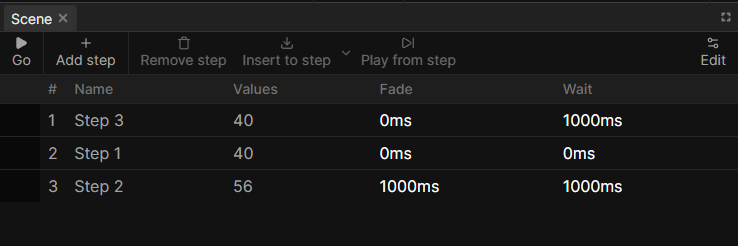
Set the timing
Each step has two times:
- Fade is how long it takes to blend in from the previous step.
- Wait is how long it holds before moving on.
Both take milliseconds or beats. Beats follow the scene's beat master, which is how you build a chase that stays locked to the music no matter the tempo.
Wait has a third option, Wait for user input. The step holds until you press Next, which turns the scene into a manual cue list.
Fix a step later
Select the step and use the two update buttons:
- Insert to step merges the current programmer into the step and leaves everything else alone. Use it to add a channel you forgot.
- Overwrite step values in the dropdown next to it clears the step first and replaces it entirely.
You can change the step order by dragging them up and down.
If you did the wrong thing by accident, you can always click Undo in the top toolbar to go back.
Play it back
Go starts the scene, Next jumps a step, Stop fades it out. Play from step starts at the step you selected, which saves time while programming a long scene.
Remember to Clear programmer before playing a scene. The programmer sits above scenes, so your live values otherwise mask what the scene actually renders.
The bar on the left of each step shows what is happening: red filling means the step is fading in, green means it is holding, and red aligned to the right means the scene is fading out.
Scene settings
The Edit button covers the rest:
- Looping repeats the scene steps instead of stopping at the last step.
- Fade out sets how long the scene takes to disappear when stopped. Zero stops it instantly.
- Beat Master picks the tempo source for beat-typed times.
- Use Global Time for Effects decides whether effects run continuously through the whole scene or restart on each step.
Pressing Stop twice skips the fade out and stops the scene immediately. Worth knowing when a look has to go now.
You can set default scene settings in Settings → General. That saves time when creating many scenes with the same behavior.
Where to go next
- Build a Timeline
- Use Masters
- See Scenes Reference for every control.