
Scenes Panel
Reference for the Scene List and the Scene panel with its steps and settings.
Scenes store looks and play them back. Two panels work together: the Scene List holds every scene, the Scene panel edits and plays the selected one.
Scenes are a central part of nextDMX, as they are the building blocks for many other features. They are the primary way to store looks.
A better system for theatres and other shows with many cues is coming in a future release. It will NOT replace the current scene editor, but will be a separate panel that uses scenes as its building blocks.
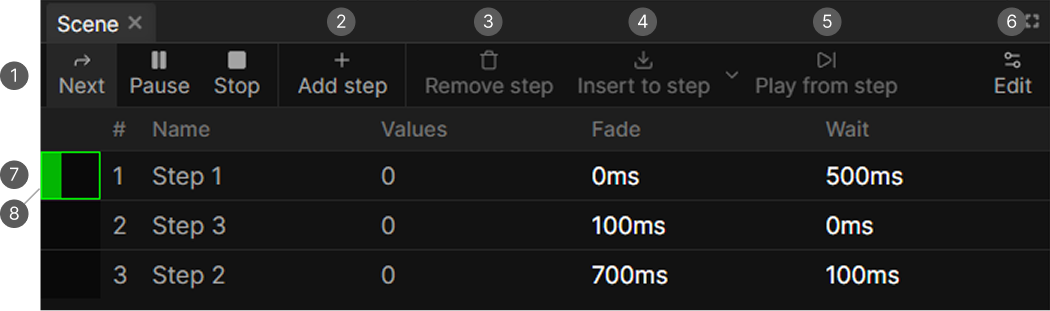
- Playback buttons. Go, Next and Stop, depending on the state.
- Add step. Stores a new step at the end.
- Remove step. Deletes the selected step.
- Insert to step and its dropdown. Merges or overwrites programmer values into the selected step.
- Play from step. Starts the scene at the selected step.
- Edit. Opens the scene settings.
- Step table. One row per step with its playback bar, number, name, value count and timings.
- Playback bar. Shows fade and hold progress on the running step.
Scene List
A searchable list with folders of every scene in the project.
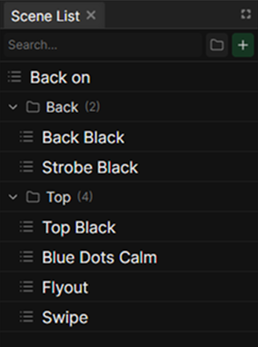
| Control | What it does |
|---|---|
| Search field | Filters by scene name |
| Folder button | Creates a folder |
| Green + | Creates a scene and asks for a name |
| Right-click a scene | Rename, Duplicate, Delete |
| Right-click a folder | Rename, Delete |
Creating a scene immediately stores the current programmer as its first step and selects the new scene.
Deleting a folder deletes every scene inside it.
Selecting and organizing
Click selects a scene, Ctrl-click toggles and Shift-click selects a range. Shift with the mouse wheel steps through the list. The Scene panel only shows something when exactly one scene is selected.
Drag rows to reorder them. Dragging several selected rows moves them together.
You can also drag a scene straight out of the list onto a timeline lane to place it there.
Scene panel toolbar
| Button | Available when | What it does |
|---|---|---|
| Go | Stopped or paused | Starts the scene, or resumes it |
| Next | Playing or paused | Jumps to the next step |
| Stop | Playing, paused or stopping | Fades the scene out |
| Add step | Always | Appends a step |
| Remove step | A step is selected | Deletes the selected step |
| Insert to step | A step is selected | Merges the current programmer into the step, keeping what is already there |
| Overwrite step values | A step is selected | In the dropdown next to Insert. Clears the step and replaces it with the programmer |
| Play from step | A step is selected | Starts playback at that step |
| Edit | Always | Opens the scene settings |
Insert to step is additive and Overwrite step values is destructive.
Pressing Stop while the scene is fading out cancels the fade and stops it immediately.
Steps
The table has six columns: the playback bar, the step number, Name, Values, Fade and Wait.
- Name is edited by clicking on the name. Enter or clicking away saves it. New steps are named
Step 1,Step 2and so on. - Values shows how many channel values the step holds, plus the effect count when it has any.
- Fade is how long the step takes to blend in from the previous one.
- Wait is how long it holds before moving on.
Click a row to select it, click below the table to deselect. Drag a row to reorder. Steps cannot be duplicated, and there is no context menu on a step currently.
Fade and wait time defaults can be set in the Settings.
Right-click a step to open the context menu with lots of options, especially the Property Matrix for editing the step's values without inserting it into the Programmer.
Time values
Fade and Wait open the Set Time Value dialog, which offers:
- Wait x ms for a time in milliseconds, whole numbers from 0.
- Wait x beats for a length in beats, from 0 in eighth-beat (1/8 beat) steps. These follow the scene's beat master.
- Wait for user input holds the step until you press Next. Only available for Wait, since a fade cannot wait for input.
The input accepts arithmetic, so 2*500 is a valid way to type 1000.
A step set to Wait for user input never fills its progress bar, it just waits.
Scene settings
The Edit button opens the scene settings dialog. Nothing applies until you press Save.
| Setting | Default | What it does |
|---|---|---|
| Name | New Scene | Renames the scene, also in the list |
| Beat Master | The project's master beat master | Supplies the tempo for every beat-typed fade and wait in this scene |
| Speed Multiplier | The project's master speed master | The speed master used when rendering this scene's effects |
| Fade out | 500ms | How long the scene takes to fade away when stopped. Zero stops it instantly |
| Looping | On | Wraps back to the first step after the last one. Off stops at the end |
| Use Global Time for Effects | On | Effects run from the time the scene started. Off restarts them on every step change |
The playback bar
The leftmost column of the running step shows progress:
- Red, filling from the left: fading in.
- Green, filling from the left: holding, that is the wait time running down.
- Red, aligned right: the scene is fading out.